The past two days have been full of frustration and problem-solving. Going back to my list…
Finish the clay hat complete with trim, buckle and shamrockPaint the shoes, hat, ring, buttons, and canePaint and glaze his eyesPaint all the skin tone using china paint (I hope)Give the leprechaun hair, beard and eyebrowsAssemble and attach the pieces on the armatureWrap the remaining part of the armature with battingConstruct the outfit – shirt, pants, and jacketConstruct the base with scenery- Put the whole thing together and photograph it
Yesterday I was working diligently on the hair, armature and beginning the clothing. I started with applying the leprechaun’s eyebrows and facial hair. Using some mohair I picked up from a sustainable living fair, I cut about 1/2 inch sections and using Fabri-tac, glued the pies onto the face. Next I worked on the head, using pieces roughly an inch and a half to two inches long. When this was done, my leprechaun looked like a woolly mountain man.
So that meant I had to give him a haircut. I carefully trimmed the eyebrows and facial hair. I found that there was a bald spot in his beard, so I applied some more hair. this time, I made a weft by bunching a ton of hair together and applying the Fabri-tac on a piece of Plexiglas. I allowed it to dry for roughly 5 minutes. Then I pried it off the Plexiglas and squished the plug together. I trimmed it down as close as I could to the end of the glue. Then I applied this piece to the bald spot. Next came styling his hair. Using a small amount of water and some styling product, I fixed it up. I gently pulled out the loose hairs, and trimmed the ends so it looked more natural.
Next up came working on the armature. I had already  glued the feet to the armature, so up next was the hands. When I first began this process, I was trying to use a hot glue gun, as this is what we used in Jack Johnston’s class. However, we were gluing the head to the armature, which works there. Hot glue does not work on brass tubing. So I emailed my mentor, who told me to try super glue. It worked great. Once the hands and feet were set, I used strips of cotton batting to wrap the whole armature, securing it with a heavy cotton thread.
Here is where things started to get wonky. My armature broke inside the cotton batting while I was trying to position my guy on his stand. Both his elbow and his knee broke. At first, I wasn’t worried. But things got crazy later on. So while his arm and leg were flopping around, I made a pair of pants out of a knit. I sewed the pants together, by hand mind you. Then carefully slipped them onto the leprechaun, getting past the shoes and feet were a challenge, but I got them on. Then I sewed the pants onto the cotton batting at his waist. I also adjusted the pants, so that they were not baggy.
Then the frustration set in yesterday. I placed the leprechaun on his stand to make sure it still worked, and BOTH of his ankles cracked! I was livid. I decided at that point I would need to fix his broken elbow and knee. So I surgically removed the batting from the joints. Using a larger brass tube to connect the broken pieces, I wrapped wire around the joint and super glued them. I then placed him on his stand and super glued the ankles. Leaving him to dry overnight.
This morning I was glad to see everything held together well. And I repaired the armature batting and strengthened his core by adding brass tubes, wire and more batting. I worked  with the stand to get him positioned properly and supported well. I had started his base with just a plaque and some tubes, drilling holes to hold the tubes in place. I decided that I wanted a more organic surface, and something that I could easily tell where the leprechauns feet should be. So I smashed Model Magic all over the base. Then I placed the leprechaun on it to set where his feet would sit. I also marked where some of the landscaping will go. I will need to drill out these areas after it is dry. I’m not sure the Model Magic will work, but I wanted an air dry clay so as to not add weight to the overall piece, and I wasn’t sure I could bake the wood without polymer clay cracking or having an issue with it. If the Model Magic doesn’t work, I will replace it with Super Sculpey.
Next on my docket for today was to work on the rest of his clothing. I like to think of myself as a decent seamstress, but not having a pattern is tough, especially working in such a small scale. I used a deep plum satin fabric to fashion a shirt. I started with the collar, which was probably the easiest part! Then using a rectangle of fabric, I draped it on the leprechaun and carefully marked and cut the shape of the front of the shirt. I used HeatnBond to create the front edges and the hem line, so I had less to sew. I sewed the front of the shirt to the collar, then placed it on the leprechaun. Since his clothing will not be removable and he will have a jacket, I did not fashion a back. Once the piece was on the leprechaun, I sewed buttons down the front. I am lucky to have these little buttons, I found them at a lapidary, why they had them, I have no clue, but they have been sitting around my house waiting to be used for ages now. When the buttons were sewn, I attached the loose fabric to the back of the leprechaun. The back is not pretty, but no one will see it when he is done. Now all this doesn’t seem like a ton, but it took me a good 3 hours to figure it our and get it done.
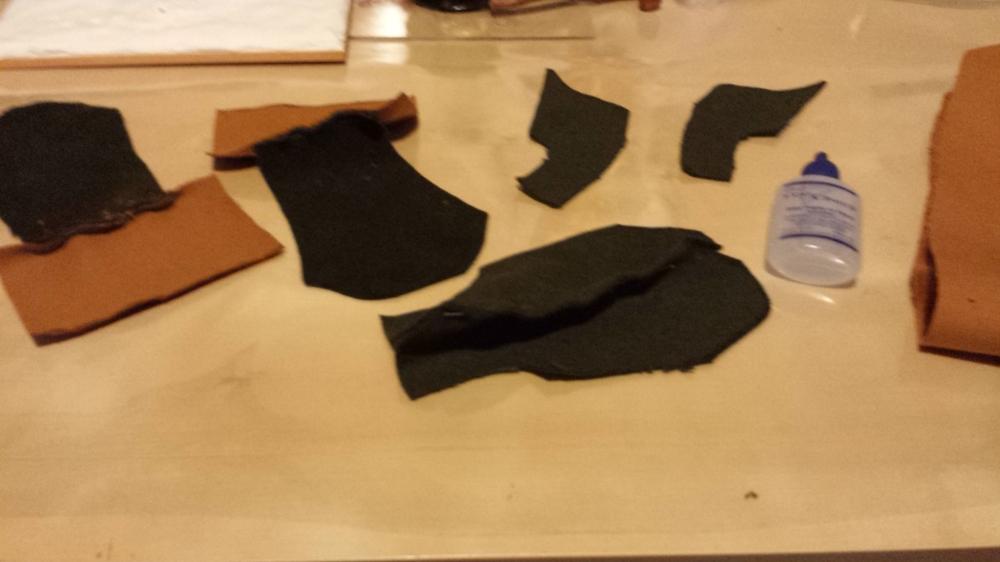
The jacket has been much quicker. I am using a heavier fabric, similar to an upholstery velvet. I’m not really sure what it is, it was gifted to me, and it just happened to be perfect for this guy. I looked on Google to see if I could find a pattern, or at least images of a pattern to figure out how to cut the pieces. I found several, and decided on a set I could use as a reference. As I used this reference, I would drape a piece on the leprechaun an mark where to cut. In the end I have all the pieces cut for the jacket. I also decided to use Fray Check on the edges, because some of the jacket does not have a trim. I thought this would be easier than trying to hem the piece. I tested a sample piece of the fabric, and I think it will work well.
So that sums up the last two days. Tomorrow, I try to kick it into high gear and finish this guy. I will need to sew his jacket (which I think I will machine sew what I can.) Put his jacket on him, and finish sewing it. Complete the base, drilling holes for the floral decor, cutting slits for the grass, adding sand to the surface of the base, and finally applying all the pieces. Then I will need to attach the leprechaun’s hat, and set him on the stand. The last thing will be to photograph him. I think I can get it all done.


